Introduction
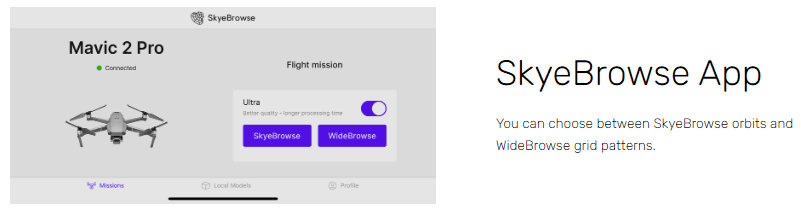
Welcome to the SkyeBrowse flight tutorial. In this guide, we'll walk you through the process of using the SkyeBrowse flight app for flying drones, covering both SkyeBrowse orbits (up to 5 acre) and WideBrowse grid patterns (up to 200 acres).
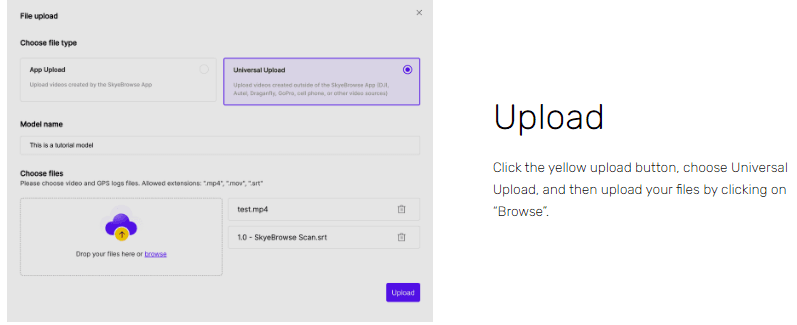
If you’re looking to upload videos captured from your cell phone or non DJI/Autel drones, check out our Universal Upload Tutorial.
In addition, you can explore our interesting use cases to learn about how SkyeBrowse is deployed in real world scenarios.
Summary
- Use 1080p video.
- Manually fly above the object you want to map out. Make sure to fly above any potential obstacles!
- Check the flight path in the map view.
- Press “Start”.
- Upload the video to map.skyebrowse.com.
Equipment and App Compatibility
Supported Devices: SkyeBrowse is available for iOS, Android, and Smart Controllers. You can see the entire list of supported devices and drones here.
Supported Drones: The flight app is compatible with Autel and DJI drones. If your drone is not supported, you still have the option to create 3D models with Universal Upload.
Getting Started
Installation: Download the SkyeBrowse flight app.
Connecting to Your Drone: Open the SkyeBrowse app and connect it to your drone. Your drone will show up on the app. Make sure DJI Pilot, Autel Explorer, or other third party apps are closed in the background.
Recording in 4K (for subscription customers): Activate the 'Ultra' toggle to record in 4K, enhancing the quality of the 3D models. Keep in mind 4K videos are significantly larger in file size compared to 1080p videos. Freemium SkyeBrowse users will not see any improved quality with 4K compared to 1080p videos.
Flying SkyeBrowse Orbits
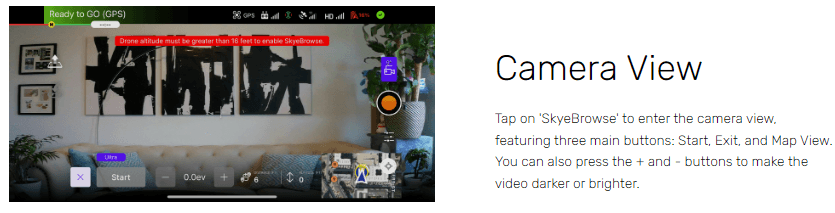
1. Accessing Camera View: Tap on 'SkyeBrowse' to enter the camera view, featuring three main buttons: Start, Exit, and Map View.
2. Take Off: Make sure your surrounding environment is clear and fly above the object that you want to map out.
3. Adjusting Brightness: Auto brightness usually works, but if the video is too bright or too dark, use the plus and minus buttons at the bottom center to adjust video brightness.
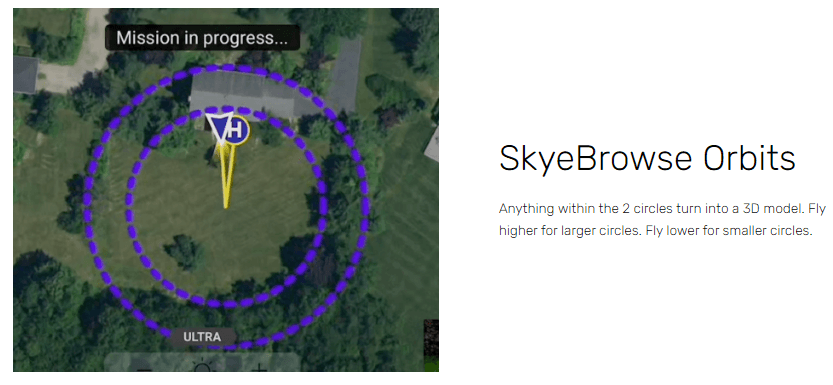
4. Expanding Map View: Tap the map view on the bottom right to see two circles that define the area for 3D modeling. The size of these circles increase when the drone altitude is higher and decrease when the drone altitude is lower.
5. Ensure safety: Make sure your drone is above any obstacles. Our automated flights will never fly lower than the current drone altitude.
6. Starting the Flight: Once positioned, tap 'Start' to begin. The drone will calibrate its cameras and start recording, covering two orbits for detailed capture.
7. Emergency Override: If necessary, the automated flight can be cancelled by pressing the “stop” button.
8. Flight Completion: The drone indicates the end of the flight with a tactile vibration and will hover in place.
Final Steps
- Data Processing: Remove the SD card from the drone and upload the data to the SkyeBrowse website. You will receive an email notification when your 3D model is ready.
If you haven’t already, you can make a free account with SkyeBrowse and create your first 3D model today!